Different iPhones are riddled with a similar problem. There are several common problems found in the iPhone 12 that still can be found in iPhone 13. One of them is the microphone issue. Many users claim to have faced the problem of the iPhone 13 microphone not working. However, there are several instructions and steps that you can follow to fix this issue by yourself.
Checking the issue of iPhone 13 microphone not working
iPhone 13 is equipped with three different microphones located in various spots. Every three microphones are located at the bottom (primary), above the screen (front), and at the back near the main camera (back). Each of them is used for a different purpose. So, to check if either of them has a problem, you have to do three things.
To check whether your primary microphone is working, you can record yourself using the Voice Memos app. To check the problem of the front camera, you can take a selfie video of you speaking to the microphone. Finally, to check the back microphone, you can record yourself using the main camera. If you hear your voice clearly during all playbacks, your iPhone 13 microphones are OK.
Fixing the issue when microphone not working on your iPhone 13
You don’t have to panic if this problem occurs. There are several steps that you can do to give your new iPhone a fix before bringing it to an official store. First, you can reinstall or restart certain apps. Second, you can disable noise cancellation. And lastly, you can update the iOS. All of those steps are easy to do and don’t require you to violate any Apple warranty.
-
Restart and Reinstall Apps
-
- Open an app that requires microphone access. Make sure that the microphone permission is On.
- Open the app and test the microphone.
- If it is not working, you can exit the app and open it again.
- If it still is not working you can uninstall the app by holding down your iPhone 13 screen.
- Then you can select which app you wish to uninstall.
- Once the app is removed, go ahead and download the app again in the App Store.
- Open the app to check your microphone.
-
Disable Noise Cancellation
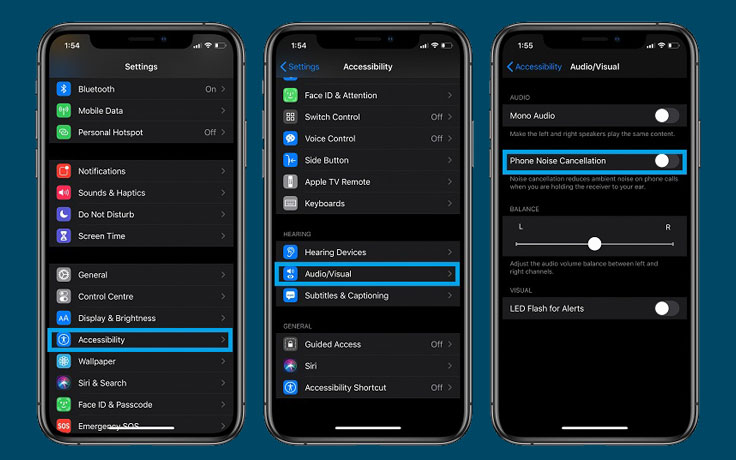
Noise cancellation is used to minimize ambiance noise when you’re speaking on the phone. Follow these steps to disable it.
-
- Open the Settings on your iPhone 13.
- Find and choose the Accessibility tab.
- After you open the tab, select Audio/Visual.
- Find the Noise Cancellation option and disable it.
-
Update the iOS
-
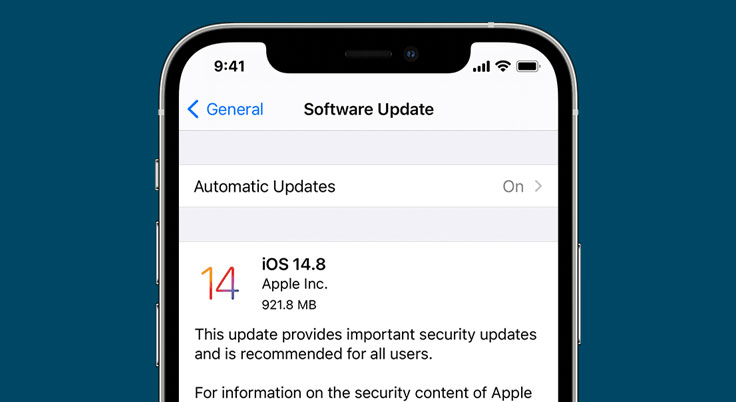
- Activate your iPhone 13 and choose the Settings through the Home Screen.
- Scroll down and choose the General tab.
- After you do that, tap on Software Update to detect any update.
- If an update is available, download the update and check the microphone after it completes the download.
In short, if the microphone on your iPhone 13 is not working might be caused by a wrong setting. To fix the problem, you need to follow the instructions. If your problems haven’t been resolved, you can contact Apple customer service and ask for an expert solution. If the problem is in the microphone’s hardware, the only option is to bring your iPhone 13 to an official Apple repair.